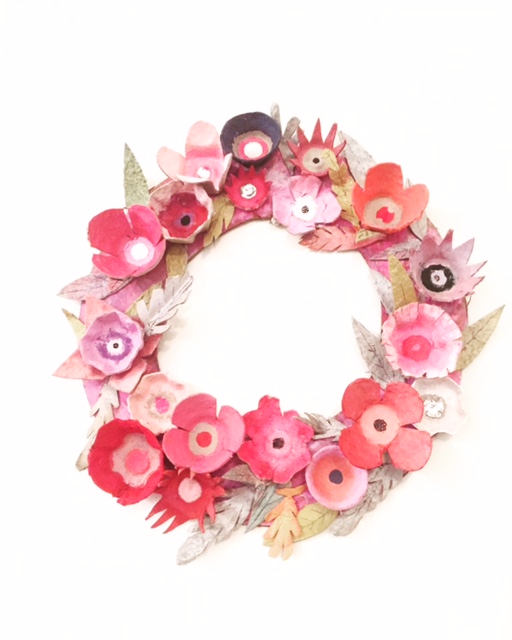
Egg Carton Flower Wreath
VENI. VIDI. AMAVI.
(We came. We saw. We loved.)
The girls went back to school yesterday, which means that I had time to write, exercise, and meditate this morning. Which means that I could actually pick up the phone, not once BUT TWICE, and I got to say yes to a lunch date at the end of the week. It also means that I have time to catch up on the back log of work that has been waiting patiently for my return. Before I start today's tutorial I just want to say that I know it might seem a little weird that we just rang in the new year and here I am sharing a "Valentine's Day Project" 30+ days before the day. But here's the thing--between now and February 14th we are going to continue to face a lot of big, important stuff. We are going to need to use our dollars, our energy, and our voices to hold the line, to protect human rights and while we do this most important work we are also going to need to remember that there is still love, and sweetness, and beauty in the world and we need to make time for it. Love is still here amidst the pain, the ugly, and the uncertainty and it is an almighty and powerful force. So how about we decide to celebrate love, not just on the day that's been set aside as a holiday, but every chance we get? Are you in? Okay, let's get to it..
I have been haunted (in a good way) by an Anthropologie display I saw awhile back. It was this gorgeous installation of beautiful, simple strands of blue and mauve hand-painted egg cartons. I pinned it knowing that it would one day inspire an Art Camp craft and Sunday was the day. I decided that it would be another great opportunity to gather my crew for a family craft session. As a group we have definitely played with our fair share of recycled materials, but none of us had ever re-purposed egg cartons in this way so it was kind of a free-form experiment. Each one of us contributed to the project in our own way. H really loved mixing and painting, R decided that she wanted to make a rose which required her to spend a lot of time layering and manipulating her egg carton pieces until she got the petals "just right", P was the master fabricator spending most of his time cutting, and I handled the finishing touches; texture, details, layout, and assembly. Collectively we really enjoyed this project and we think you will too!
Materials:
3-4 cardboard egg cartons per wreath
acrylic paint
washi tape
cardboard cut in a circle or a heart shape
glue gun
1. Start by separating your carton sections with scissors and blending colors for your paint palette.
2. Trim your carton sections to look like flowers. There is no right or wrong way to do this. We kept some of ours very simple--some in classic flower shapes and some were very experimental. We really took a free-form approach. Think about scale and variety. Think about layering some and flattening some. The recycled paper cartons are very soft and easily manipulated...just play around with flower shapes!
3. Once you have created your flowers it is time to paint.
4. If you are using acrylic paint or tempera sticks your paint will dry very quickly. Once it dries you can add details to the centers of your flower buds.
5. On some of the blooms, we added little dots of washi tape and silver duct tape in the center for a little pop!
6. Cut leaf shapes out of the remaining egg carton scraps.
7. Add veining details on your leaves with a fine point pen and then layer metallic tempera stick or oil pastel on top for a very cool effect.
8. Cut out your cardboard wreath bases. We made a circle and a heart shape.
9. You can paint your wreath base to match your blooms or choose a contrasting color. We used pink and white Kwik Stix to color ours.
10. When your base has dried you can start to attach your blooms and leaves with a hot glue gun.
11. Time to spread the love and hang your wreath!


